Add Image to Column Header in ListView .NET
Created: 14 August 2013
ListView control initially only shows a text in column header and even an image is added it usually appears at the left side before header text. IntegralUI ListView allows you to add image of different sizes and place it in different positions for each column header separately.
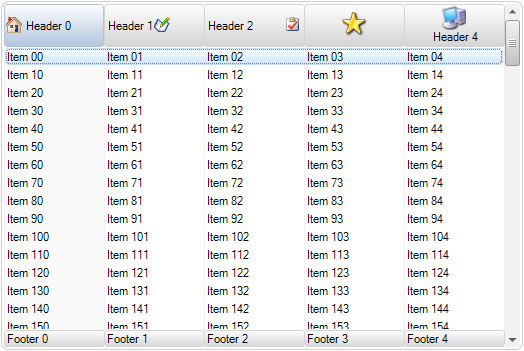
Header Image Before Text
The easiest way to add image to column header is to use an predefined ImageList and apply it to ListView.ColumnImageList property. Then by using ImageIndex property for each column, we can add and place an image before header text.
column.ImageIndex = 2;
column.ImageIndex = 2
Header Image After Text
However, if we want to place a header image in different positions we need to use a built-in tag. This tag acts like standard HTML
tag and allows you to add image in different ways and place it in different positions. Each column has a HeaderContent property which accepts a HTML generated code and ListView internally interprets the code and executes it. For example if we want to add an image and place it after text we should use the following code:
column.HeaderContent = "<div>" + column.HeaderText + " <img index=\"2\"></img></div>";
column.HeaderContent = "<div>" & column.HeaderText & " <img index=""" & j.ToString() & """></img></div>"
We will notice that image will be placed imediatelly after the text, which actually doesn’t look good. We can change that by using a inline styling and align the header image to the right side:
column.HeaderContent = "<div><table width=\"100%\"><tr><td width=\"100%\">" + column.HeaderText + "</td><td style=\"align:middleright\"><img index=\"2\"></img></td></tr></table></div>";
column.WordWrap = true;
column.HeaderContent = "<div><table width=""100%""><tr><td width=""100%"">" & column.HeaderText & "</td><td style=""align:middleright""><img index=""2""></img></td></tr></table></div>"
column.WordWrap = True
In above code we are also setting the WordWrap property to true, which means that whenever column is resized the image will also reposition and will always remain at the right side of the column header, close to column border.
Header Contains Only Image
In this case we are also using the <img> tag, however without the text. And also the header image is centered both horizontally and vertically:
column.HeaderContent = "<div><table width=\"100%\"><tr><td width=\"100%\" style=\"align:middlecenter\"><img src=\"../../../Demo/favorites.ico\"></img></td></tr></table></div>";
column.WordWrap = true;
column.HeaderContent = "<div><table width=""100%""><tr><td width=""100%"" style=""align:middlecenter""><img src=""../../../Demo/favorites.ico""></img></td></tr></table></div>"
column.WordWrap = True
Header Image Above Text
Image can also be placed above column header text. For this purpose we are using <table> tag which allow as to create table layout inside each column header space. In this example the table is divided in two rows and one column, The cell above will contain an image, and the cell below will contain the text:
column.HeaderContent = "<div><table width=\"100%\" style=\"align:middlecenter\"><tr><td width=\"100%\"><img src=\"../../../Demo/pc.ico\"></img></td></tr><tr><td>" + column.HeaderText + "</td></tr></table></div>";
column.WordWrap = true;
column.HeaderContent = "<div><table width=""100%"" style=""align:middlecenter""><tr><td width=""100%""><img src=""../../../Demo/pc.ico""></img></td></tr><tr><td>" & column.HeaderText & "</td></tr></table></div>"
column.WordWrap = True
A sample project in C# and VB showing how to add and position image in column header is available for download from here: Add Image to Column Header